
How to Deploy a Contract to the Secret Network on Windows
Jul 28, 2023
David Tilšer
This article is for beginners who want to learn how to deploy their first contract on a Secret Network. If you don't know what Secret Network is, it is a blockchain on Cosmos that solves the privacy problem. Other blockchains are public and anyone can see your transaction history and everything if they know your address. On Secret Network, no one sees what you don't want them to see, and that's very interesting.
Secret Network is definitely one of the most interesting projects on Cosmos in my opinion and it's definitely worth finding out more about. I am not going to explain what Secret Network is in this article. It is described very well on the Secret website. The purpose of this article is to help you deploy a smart contract on testnet. So let's roll up our sleeves and get started.
IDE Setup
The first thing you need is an IDE to use for development. There are many choices. I recommend installing the Intellij IDEA and the Rust plugin. Keep in mind that Secret's smart contracts are written in Rust, in a framework called CosmWasm. It's worth checking out their site, they have great documentation. If you are not familiar with Rust, you will need to learn it. For learning Rust, I recommend my favourite channel Let’s Get Rusty.
If you are an experienced developer, use the IDE of your choice. If you are not sure what to choose, install Intellij IDEA and the Rust plugin by JetBrains.
Rust and Wasm
Install Rust - instructions are here. And install Wasm - instructions are here.
Docker
You will also need Docker as well for the local Secret Network. Download and install Docker from here.
Deploying Contract
Now you should have everything that you need. Open PowerShell and clone the smart contract example.
This is a working contract. In the next article we will explain how to program contracts, today we will explain how to compile and deploy them.
Once you have the repo, we need to compile the code. Use the command:
Then go into the Makefile and edit "build-mainnet-reproducible". Let's use the latest Secret Contract Optimizer. Change from 1.0.8 to 1.0.9. Then run the command:
If you have any problems in PowerShell, you need to run it in WSL2. And then enable Ubuntu in Docker Settings -> Resources -> WSL Integration. Do not forget to use the "sudo" command when using WSL, otherwise you will get an error message with permissions.
The output of this command will be a zipped, optimized build, ready to be stored on the Secret Network. Check your project root. There should be a file called contract.wasm.gz. Let's unpack it with the command:
Now it's time to use secret cli. But we have not installed it yet. Let's do it. Go to this page and download the latest version. Put it in a file that you do not intend to remove in the near future. Rename the file to "secretcli". Go to the Windows Environment Properties and add the path to the 'secretcli' to the 'Path'. Then restart your PowerShell and if you have done everything correctly, you should not get any error when you run the following command:
Well done! You are now ready to send your first contract to testnet. The first thing you need to do is to tell testnet that we want to communicate with it. Use this command:
Now create the wallet. Use this command:
Instead of "my_wallet" you can choose any name you like. If you did it correctly, you should see your wallet after running the following command:
Everything costs some fees, this is the same on Secret as on other blockchains. So we need a test SCRT for deployment. Go here and send tokens to your wallet. Enter the address of your newly created wallet. It starts with "secret1...".
Time to deploy our contract. Let's deploy it.
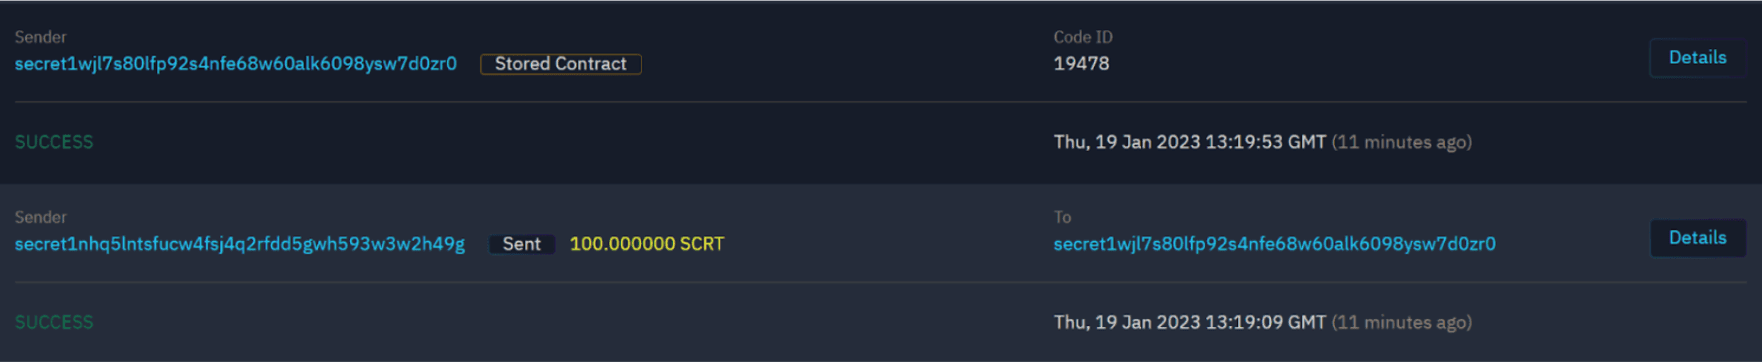
Now let's verify it. Go here and check that you have two transactions in your wallet. The first should be receiving tokens from Faucet. The second should be a transaction of type "Stored Contract". Below is what you should see:
Now we need to initialize the contract. Use this command:
Instead of "code_id", use the code ID of your contract. You can find the ID in the transaction history on Blockchain Explorer.

Now the contract is deployed and initialized on testnet. Use this command or check the transaction history to find out the contract address.
So you have done it! You have created your first contract on the Secret Network! Well done! Now you are ready to start developing. Next time we will develop a simple dApp. Happy coding!

Building successful
products.together.
© 2008—2023 Cleevio
Lesnicka 1802/11
613 00 Brno
Mississippi House
Karolinska 706/3
186 00 Prague
Prague office
Brno office
CIN 18008844